This tutorial is being translated based on original tutorial in PSH. Some sentences structures have been edited as well as some terms have been replaced for better understanding, in my opinion. xP I hope english readers can understand the tutorial. o.O' I don't quite get some of the physic terms in chinese so they were translated based on guessing (it's difficult to check with dictionary too). I'm not good in english language, so feel free to leave comments and suggestions about the mods and my translation too so i can improve my english. =)
Click here for Original Tutorial by BurningFinger (PSH)
*Words in Italic are added by me for various reasons, you'll know as you read them. x]
========== START ==========
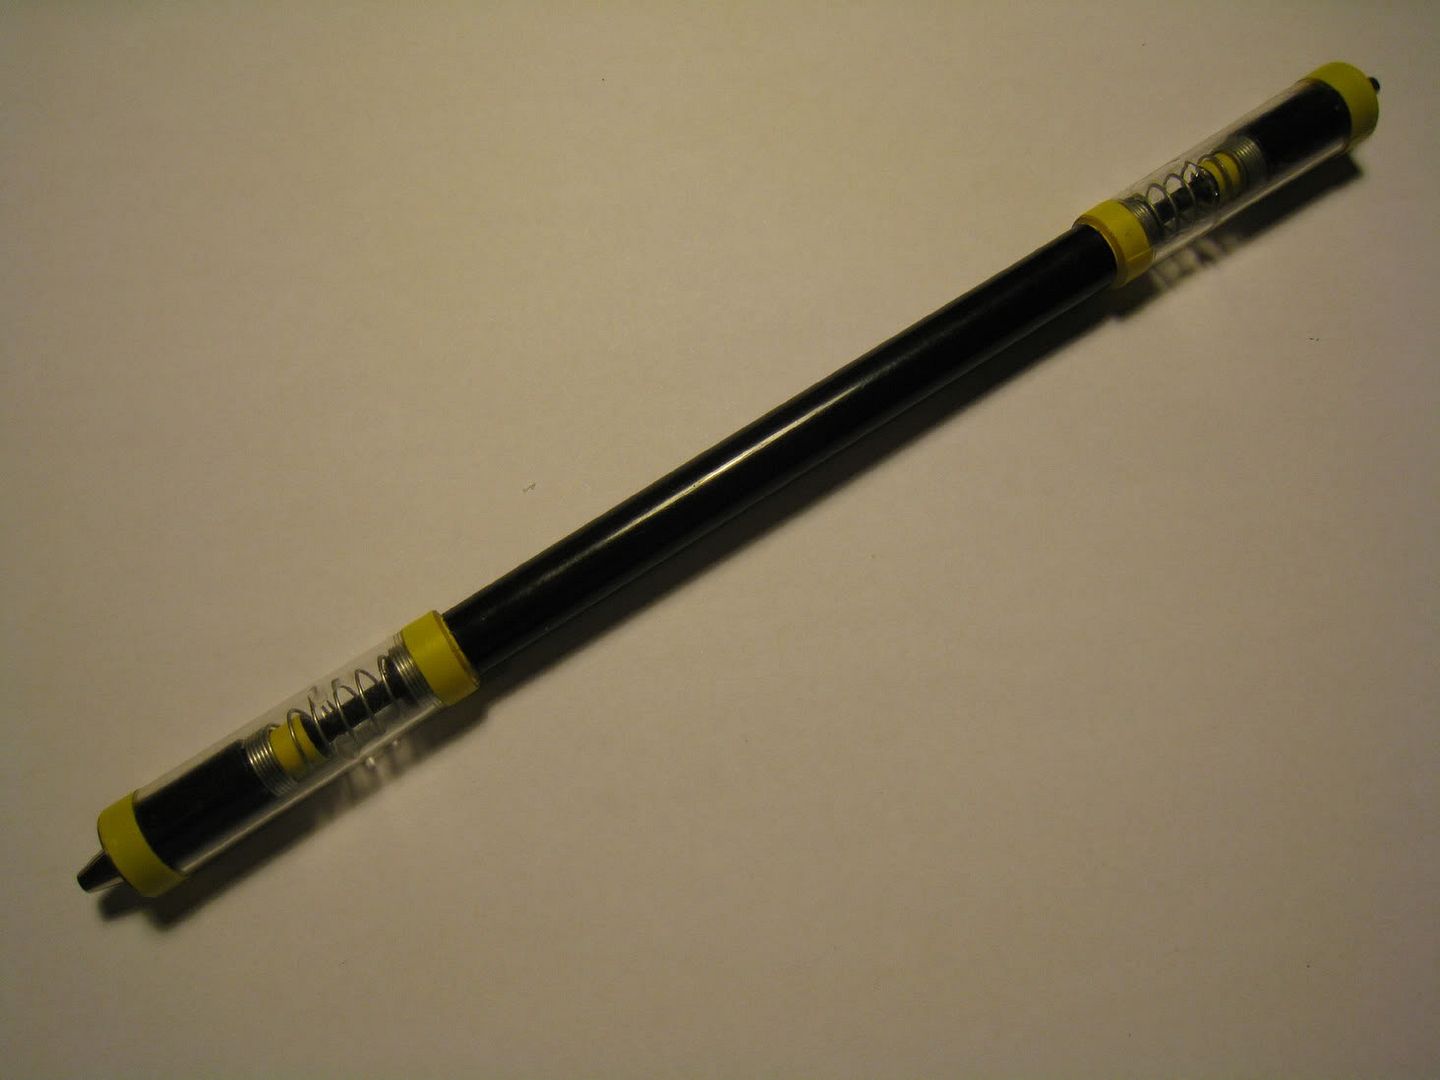
Introduction: Black body, double capped, rod, leftover materials... Although it looks unremarkable, it seems like fate. After billions of years, suffering again and again, testing this fragile yet resolute being. However, it endured and evolved into a weapon that resist nature. It is called...
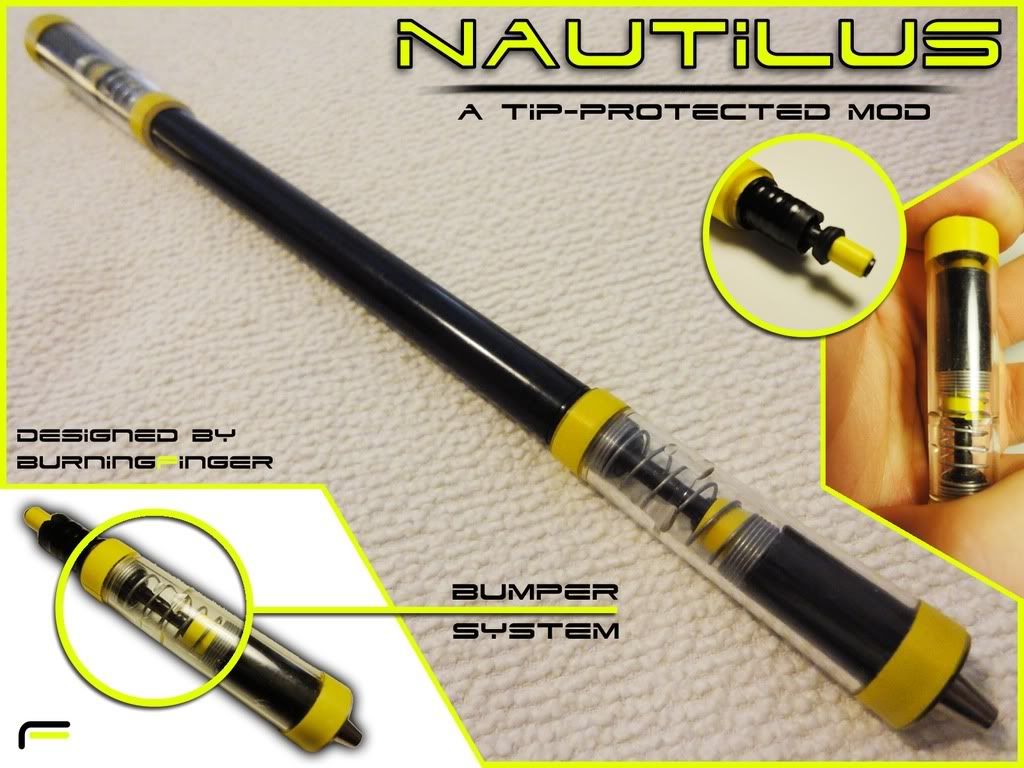
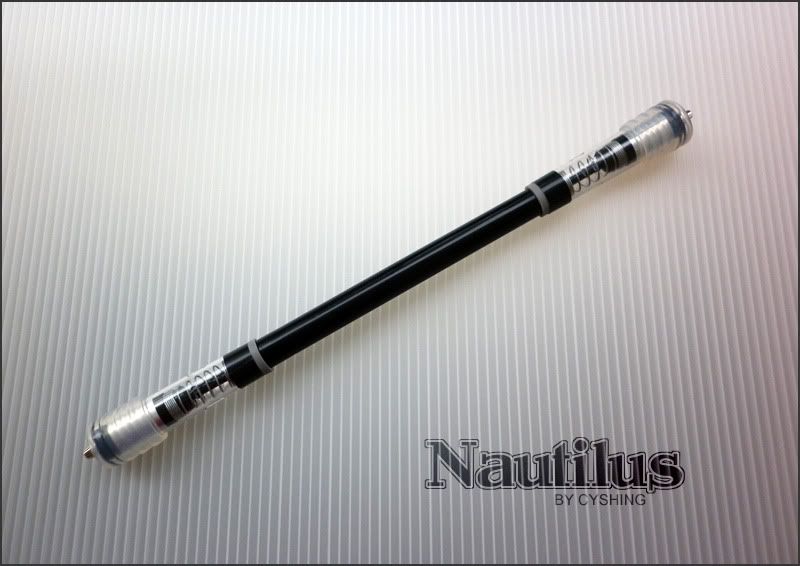
the Nautilus (鹦鹉螺) mod by BurningFinger.
This mod was evolved from my CT-153 mod, also called CT-153E mod. In fact, it is a redo version with my experiences after a year, i just changed its name to a more appropriate one.
~
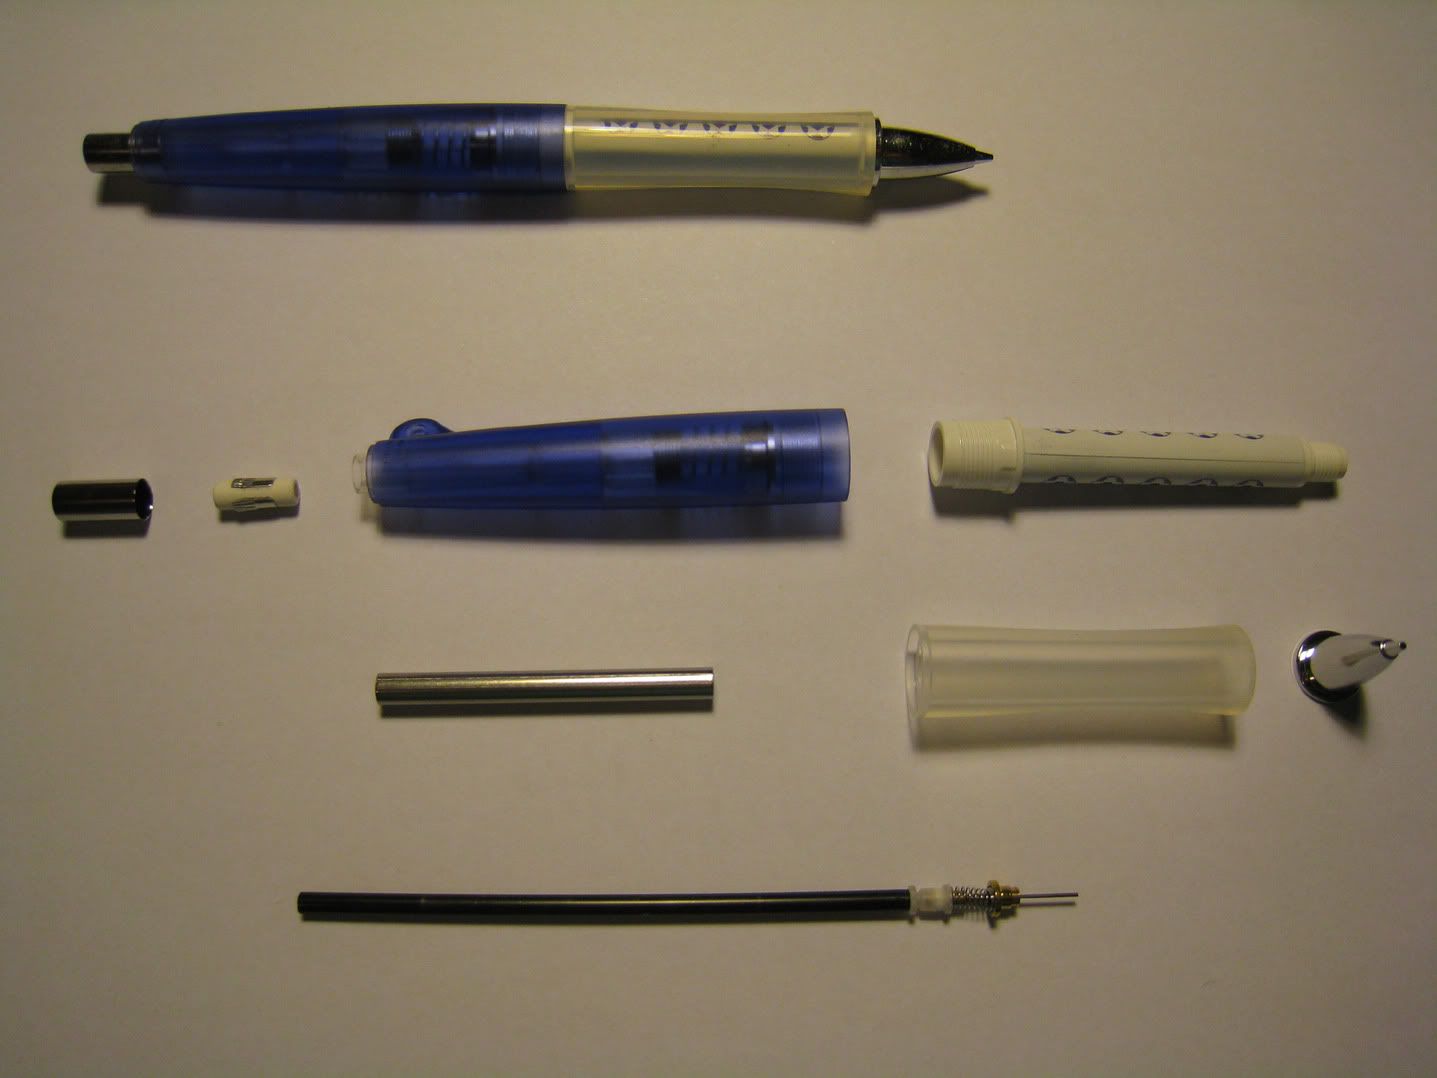
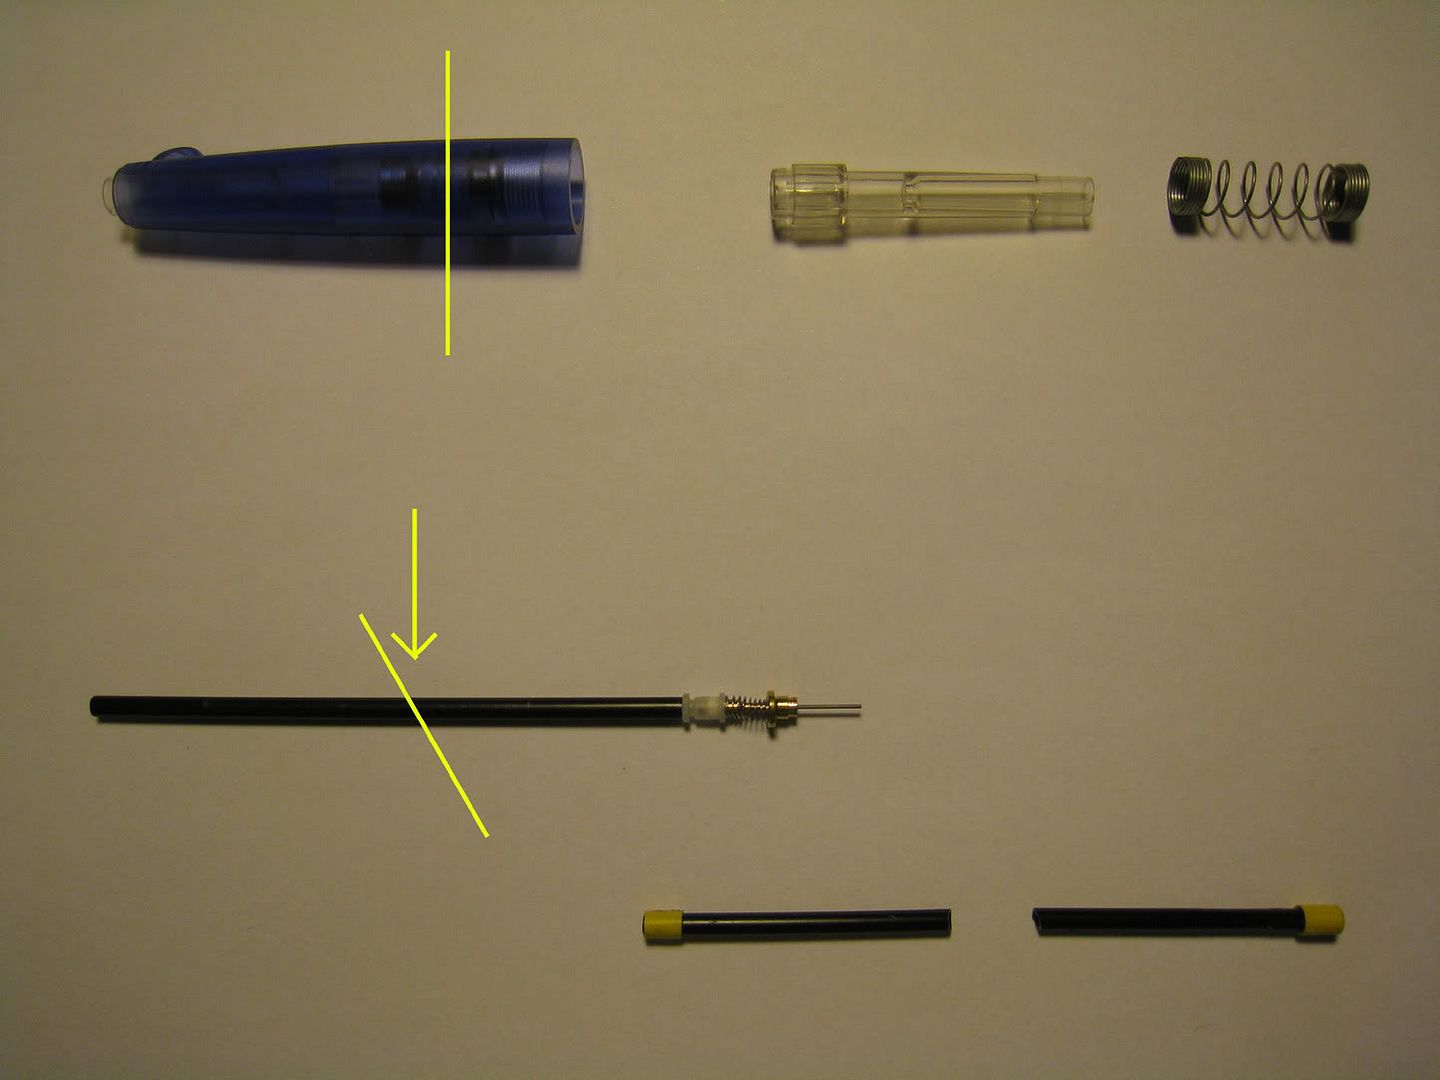
The following is the structural decomposition diagram.

The making process may be relatively long so need some patience and being conscientious. The data and experience were gained from several times of trial and error by me, especially certain cuttings, so every step needs to be precise in order to do this mod properly.
No more nonsense, here is the main text:
~
The idea of the design: Protecting the tips and material utilisation without forgoing the feel of spinning.
Materials:
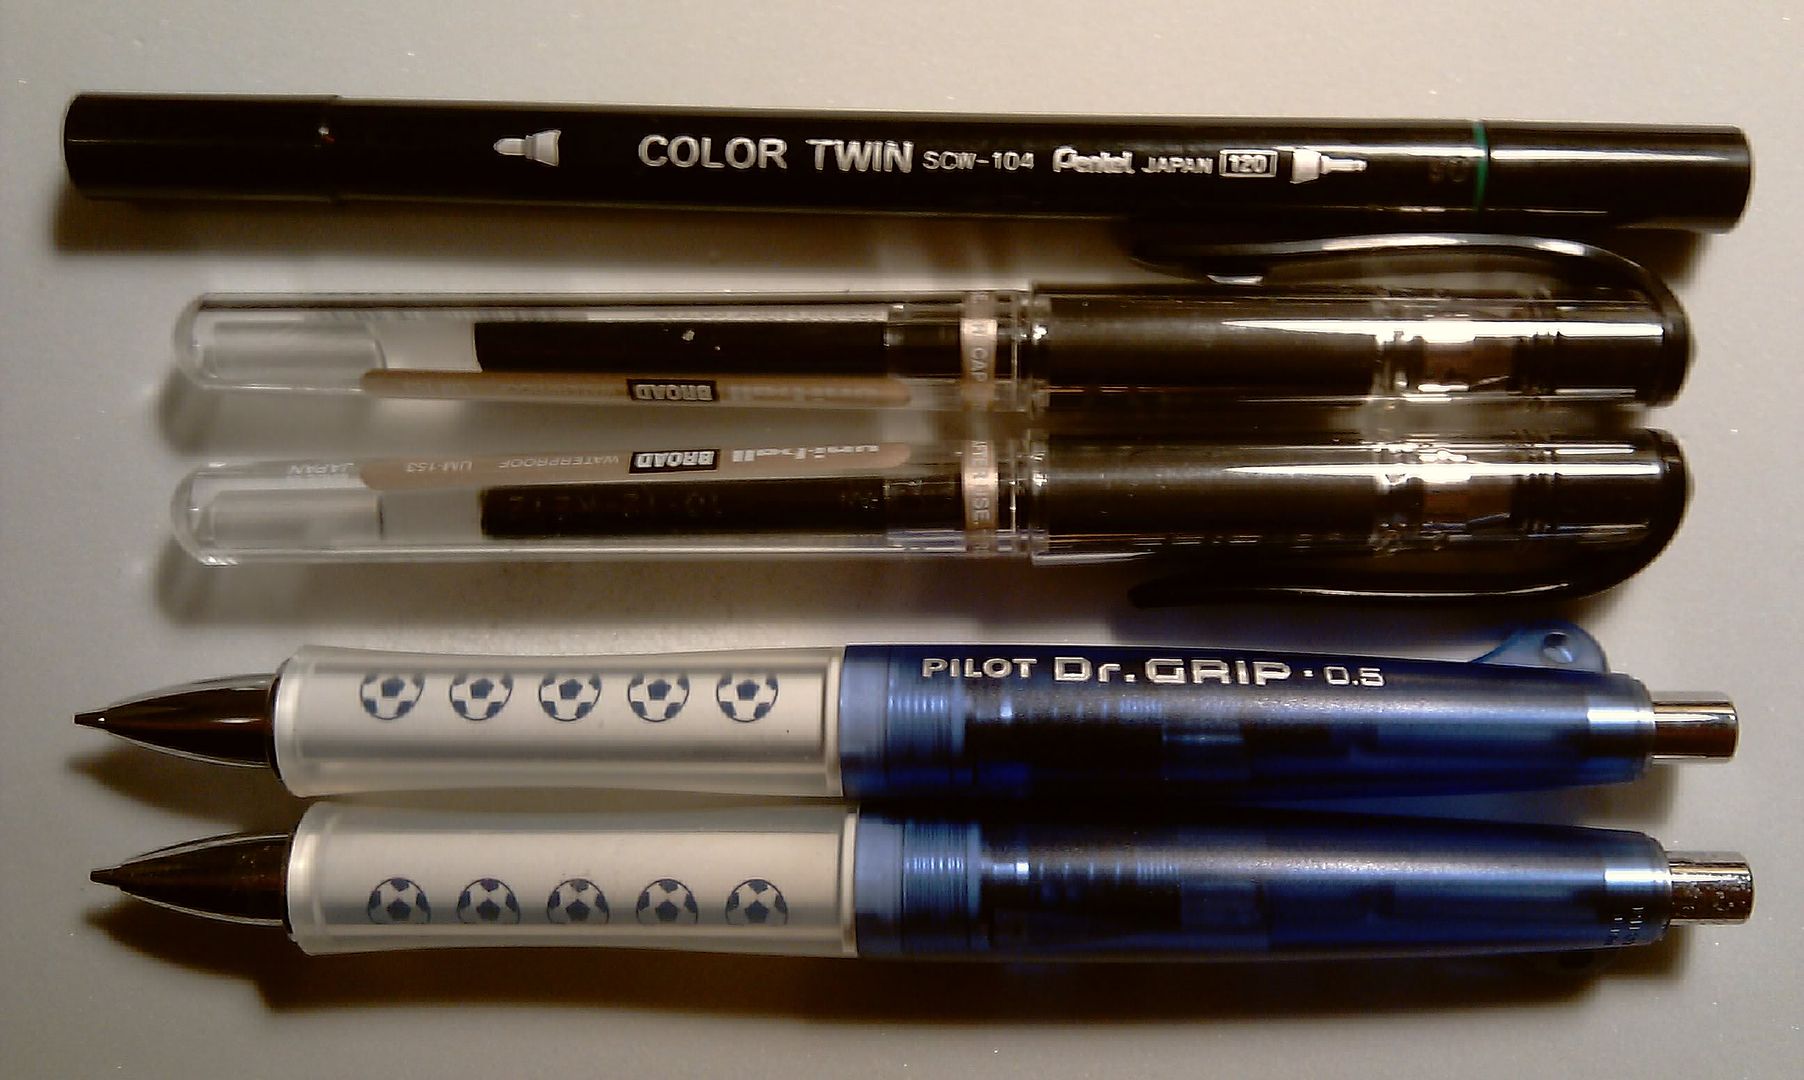
2x Pilot Dr.Grip
2x Uni-ball Signo Broad
1x Pentel Color Twin (CT) small cap (if you want to get only 1x Pentel Color Twin)
1x Sailor Gel grip (4 lines; not shown)
Tools:
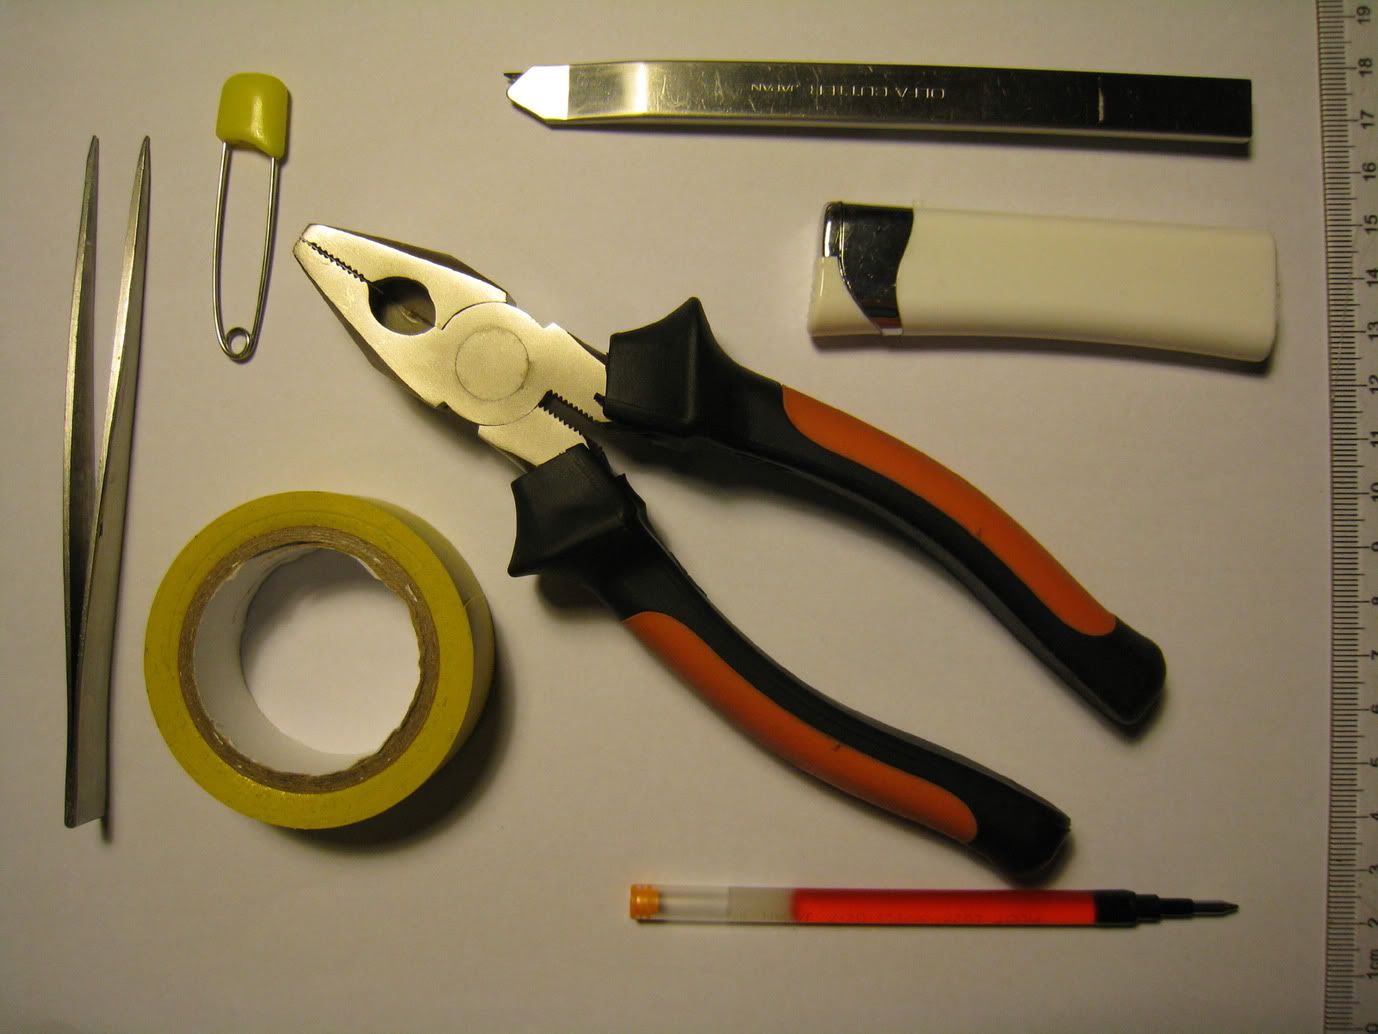
Pin (or anything thin and sharp)
Electrical tape
Pliers (mainly used to disassemble CT, and when need to redo)
Knife
Lighter (to heat the knife) (Optional)
Ink tube (Any, or may use Signo Board ink tube, just used as a tool) (or any long stick that can goes into CT barrel)
Ruler
Optional:
Sandpaper (Not needed if have good cutting skill but it is recommended that you use)
Superglue (Not recommended but will be mentioned later)
Hot glue (Read Q&A)
Stats:
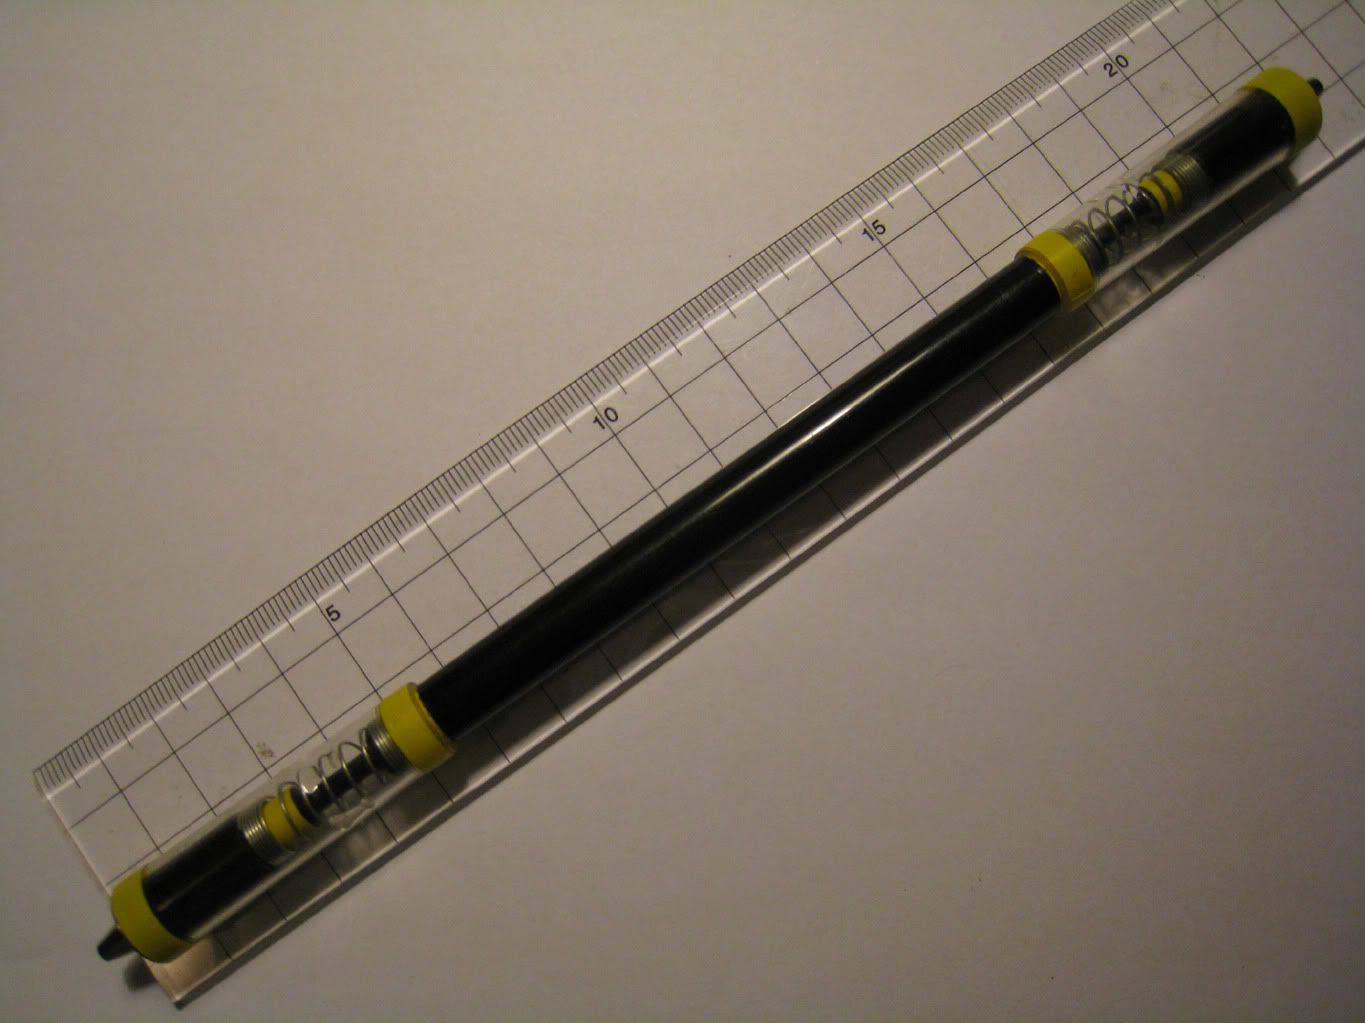
Length: 20.5cm(without tips) - 22cm(with tips)
Weight: Similar to CK mod (Waterfall mod=14.5g < Nautilus mod=16g < Buster CYL=18.5g)
COG: =COP
Style: Double sided
Writing Mechanism: N/A
Function: Shock reduction (tip protection)
Difficulty: Relatively high (in my opinion... failed a few times, broke a lot of things, but it's very challenging and has a great sense of accomplishment after completion. hehe)
Estimated cost: ?? (Please estimate it yourself. xP)
Test:
1. In the test, no parts are damaged, tips are undamaged. Height was an estimation, vertical release by hand.
2. This main function of this mod is to reduce shock and protect the tips. However it is unable to remain undamaged if received too large of external force.
Results:
---------------------------------------------------
Height: 1m / 1.5m / 2m / 2.5m
Times: 5 / 5 / 5 / 3
Extent of damage: None / None / Spring slightly loosed / Front cracked
---------------------------------------------------
*Of course, the mod solidness varies from person to person. The mod that I used in test was being disassembled for many times, therefore the structure is somewhat loose, the actual solidness based on the idea is much better. This tutorial introduced the worst approach for solidness, but will mention ways to improve solidness and allow the mod to withstand greater impact.
Tutorial:
0) Gather the materials.
1) Disassemble Dr Grip as shown.
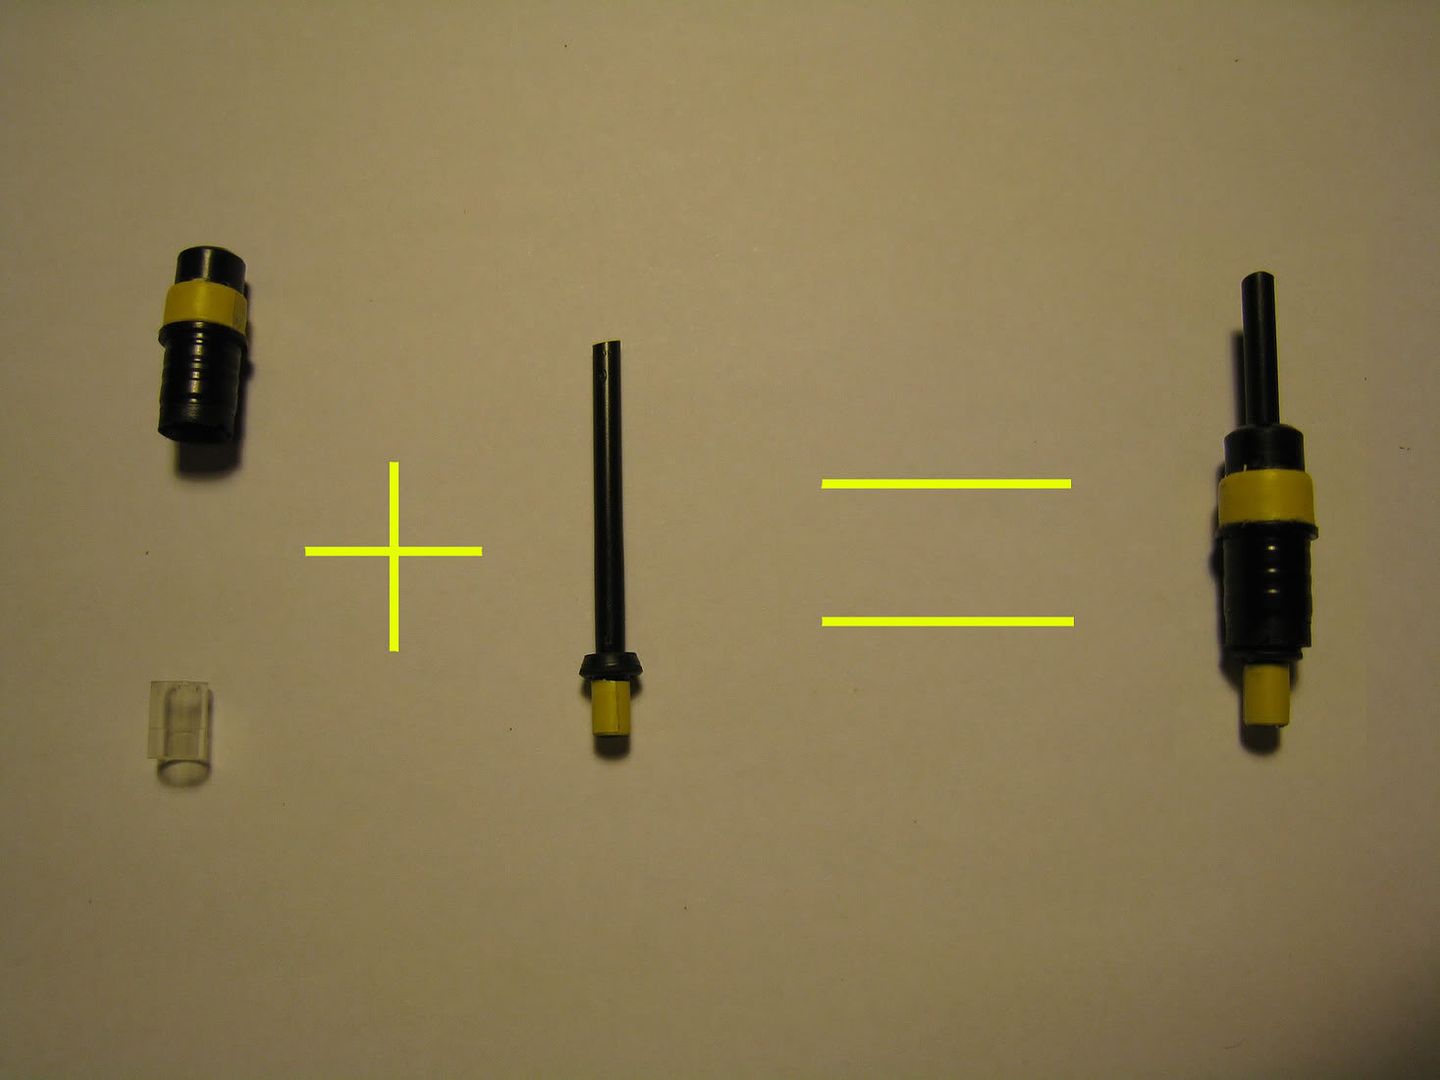
2) Use hot knife method (use lighter to heat the knife till it's very hot) and cut around the Dr Grip barrel to get the spring and inner plastic barrel. (May use stick to poke out the inner plastic barrel but it may break easily, need to use it later)(Just poke it out with thin stick is fine, none of mine breaks) Then cut the mp tube at around 15-30° at center as shown in the following picture, and wrap with 3-4 layers of electrical tape that is 3-4mm wide.
(P.S.: The number of Dr mp tubes used does not matter, I only used one because i want to save another for other mod. Cutting the mp tube longer is better for later step. May use two mp tubes and cut them longer.)
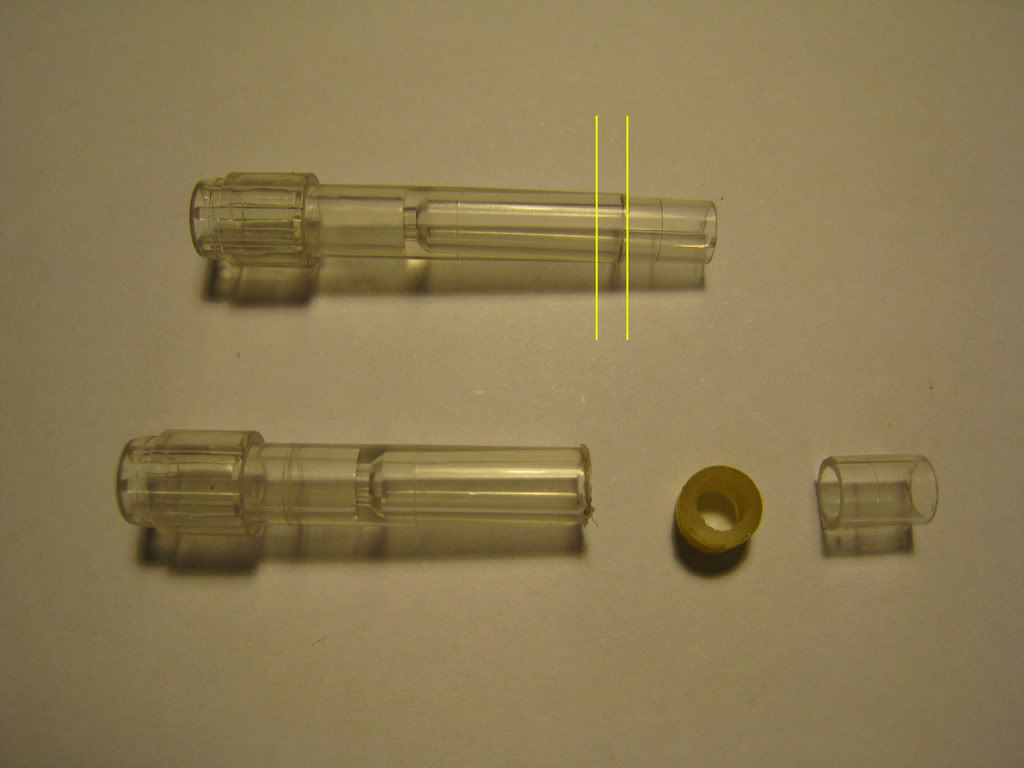
3) Measure from the end of Dr Grip inner plastic barrel and cut at the points at 0.8cm and 1.1cm respectively, into 3 pieces as shown in picture. The last two pieces are 0.3cm and 0.8cm. Then wrap a little more than one layer (not too much) of electrical tape around the 0.3cm piece.
4) Disassemble Signo Board as shown.
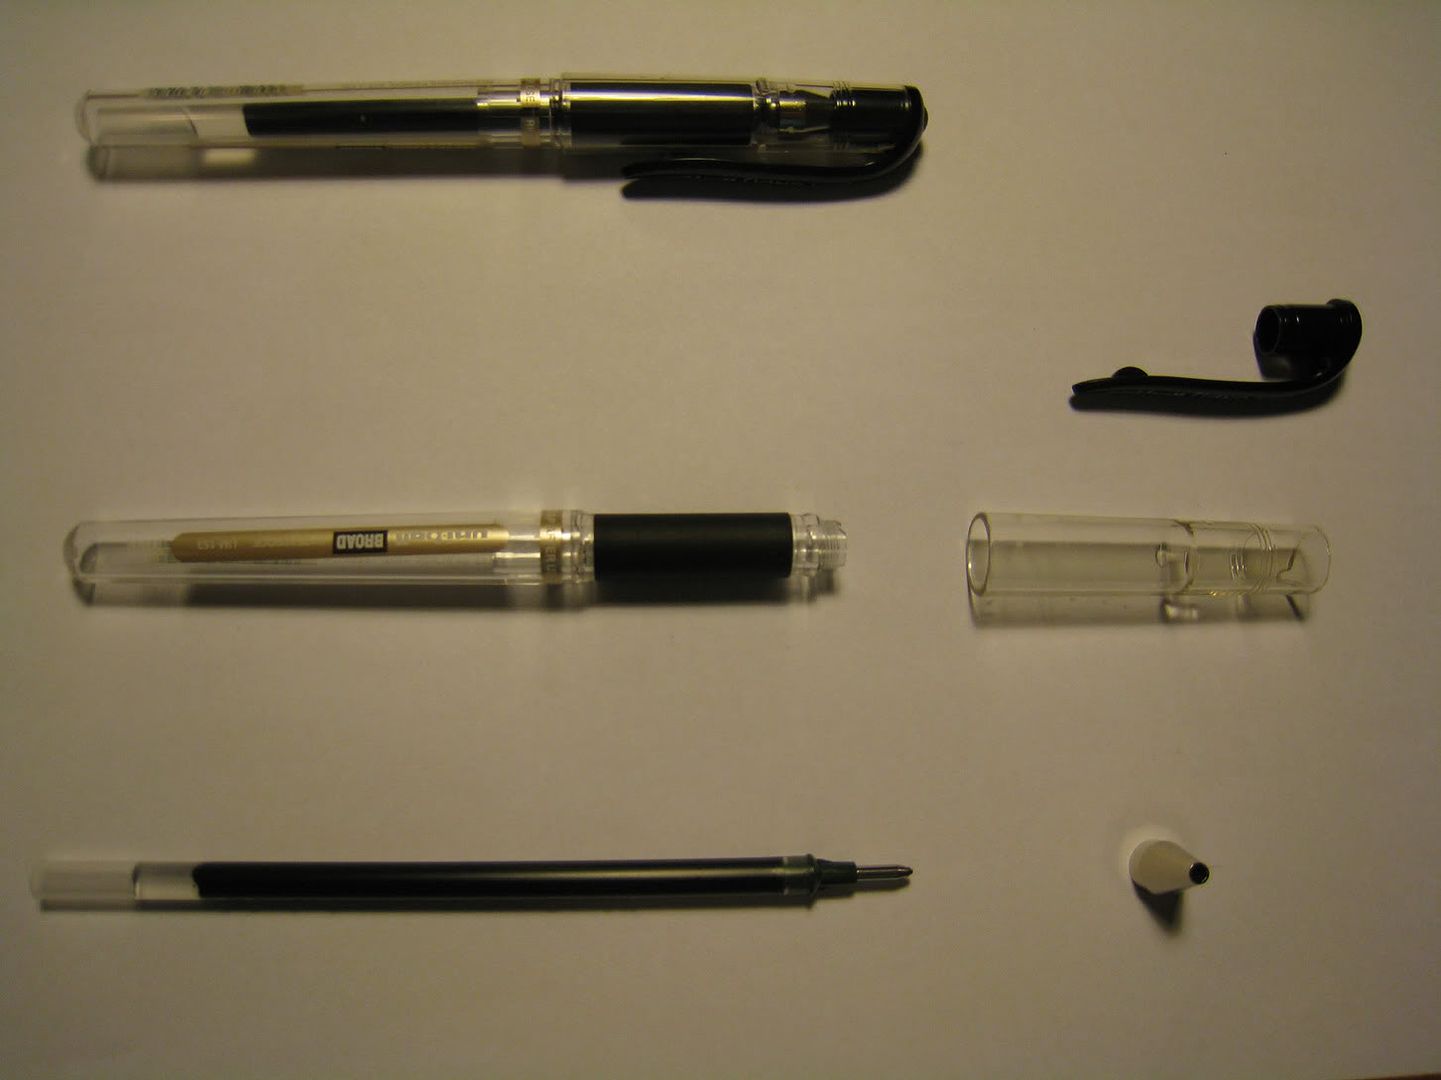
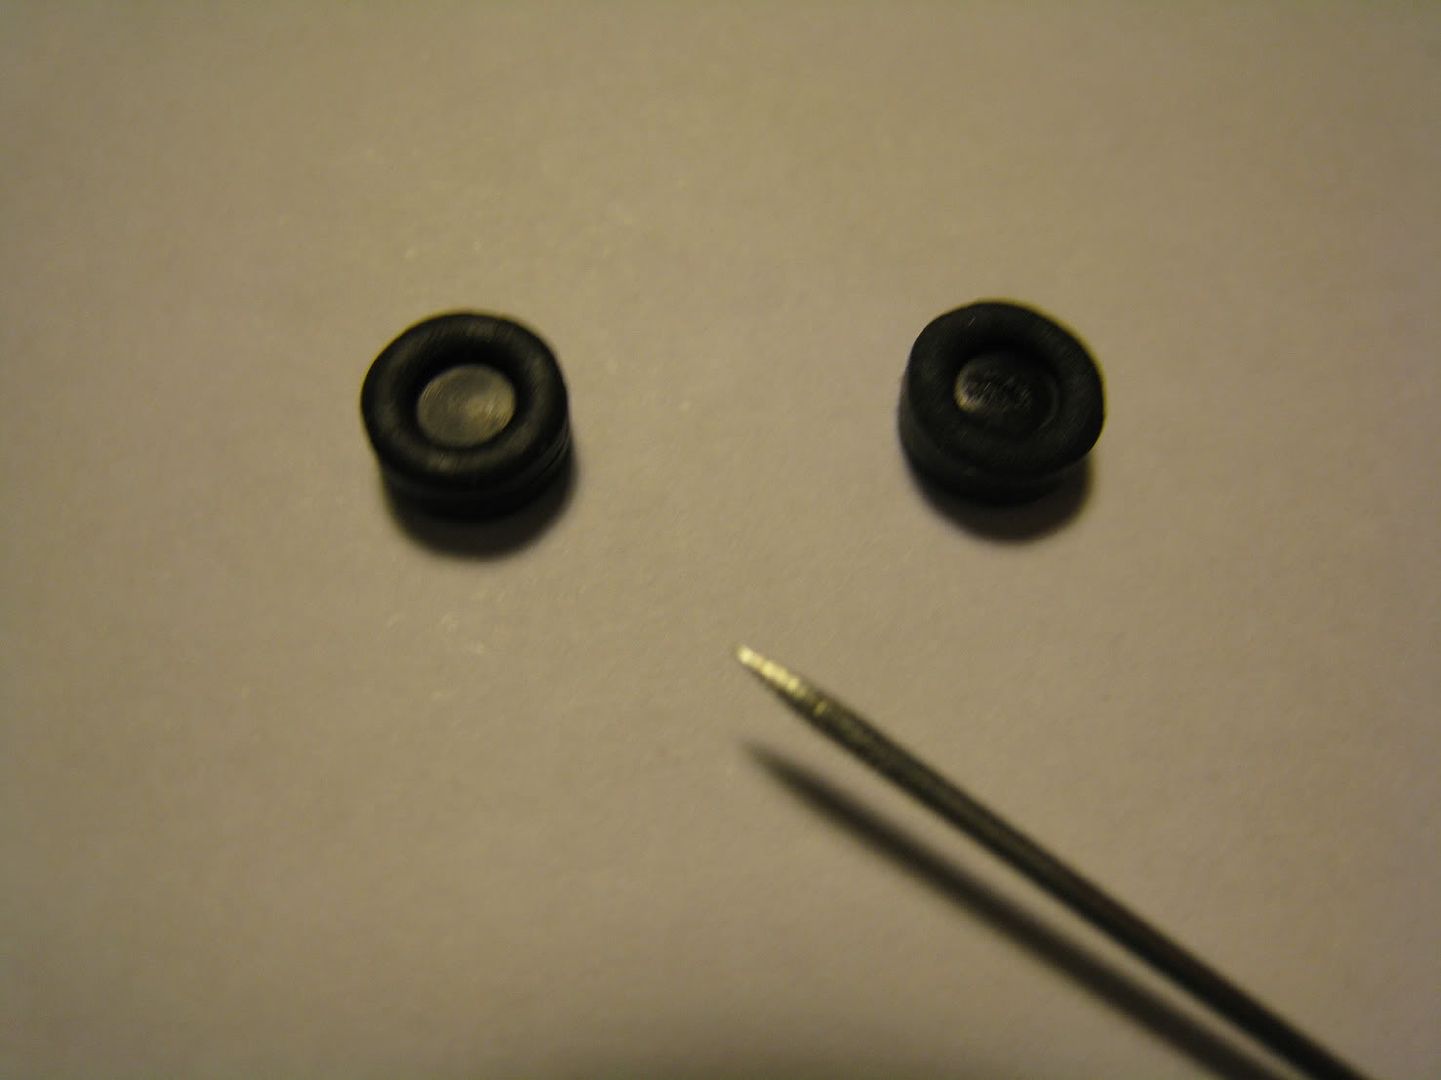
5) Cut the Signo Broad caps into 5.2cm long (that is cut at the indent line of cap), may add about 4mm wide electrical tape at both end for decoration. Then take out the little rubber piece from Signo Broad cap head with forceps.
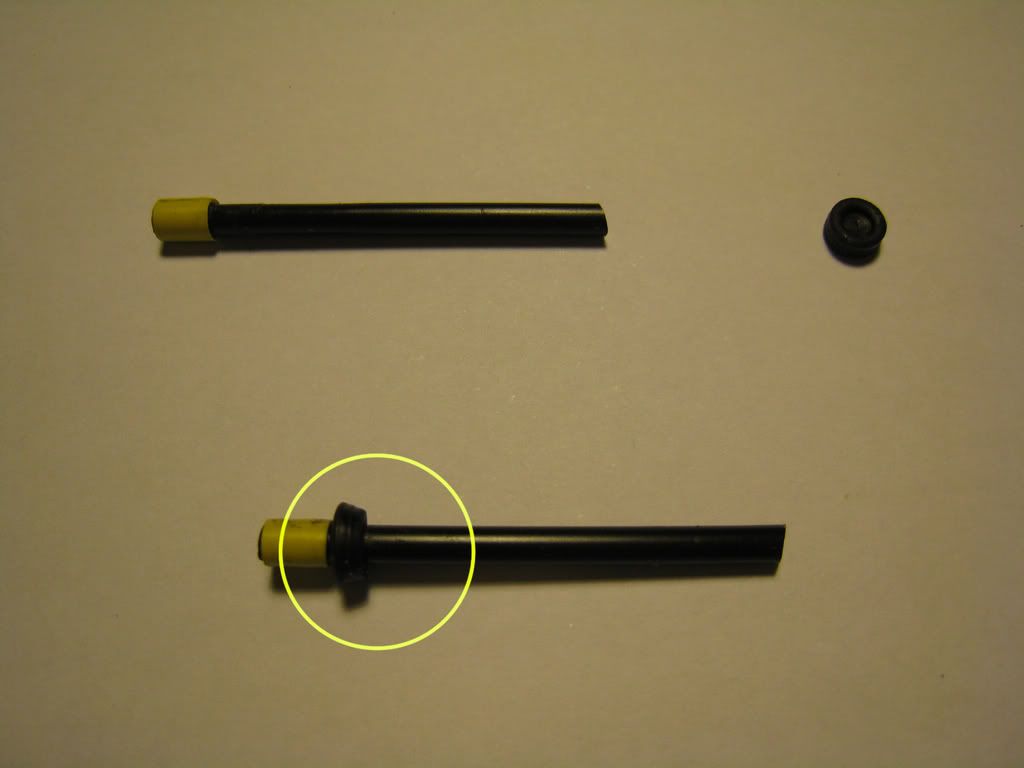
6) Use the pin to make a little hole on the little rubber piece, then use forceps to extend the hole a little more. (the size of the hole must not bigger than the mp tube outer diameter, just a little is enough.)
7) Put the mp tube through the little rubber piece, the flat side of the rubber piece should stick to the electrical tape and the dented side should face out. (See note)
8)
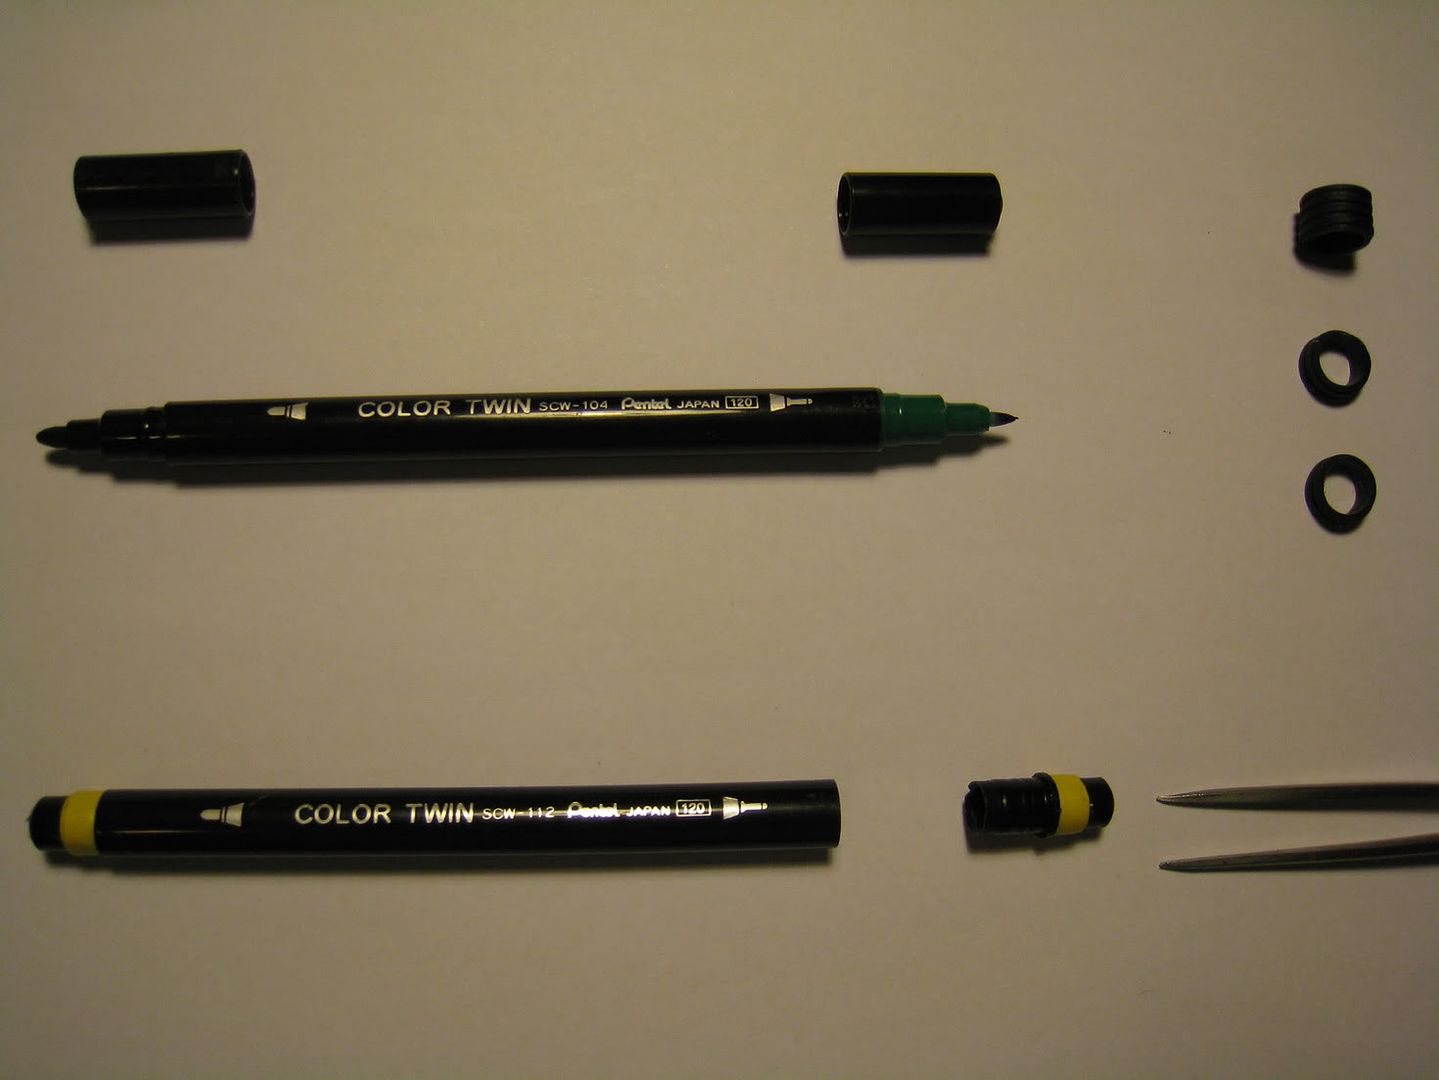
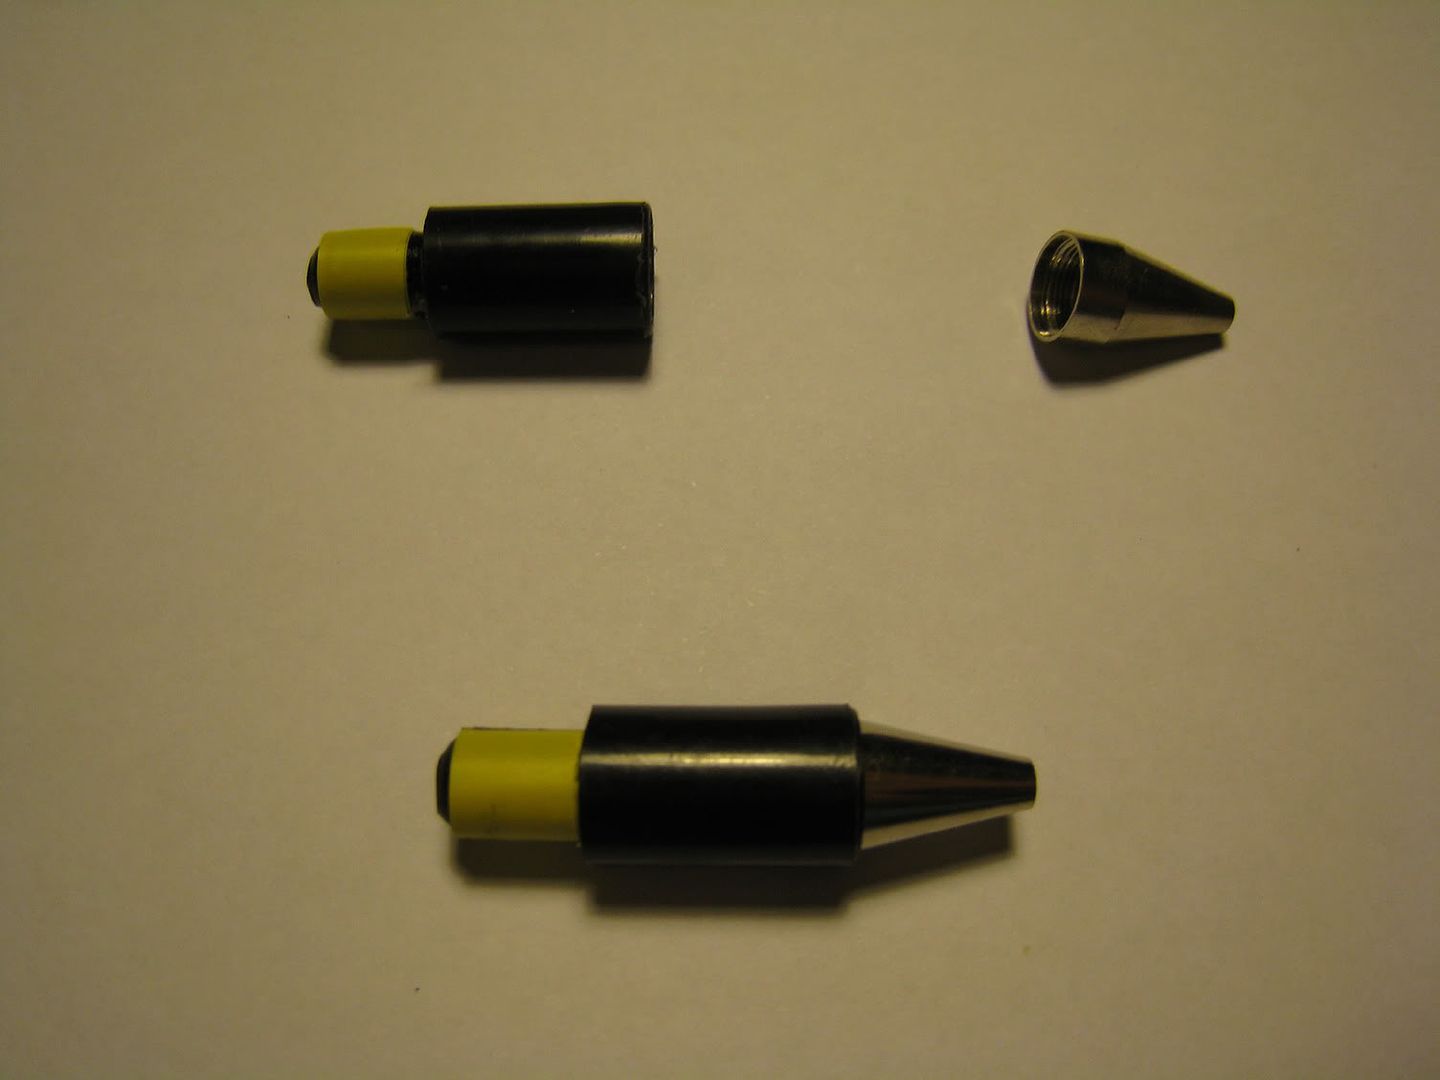
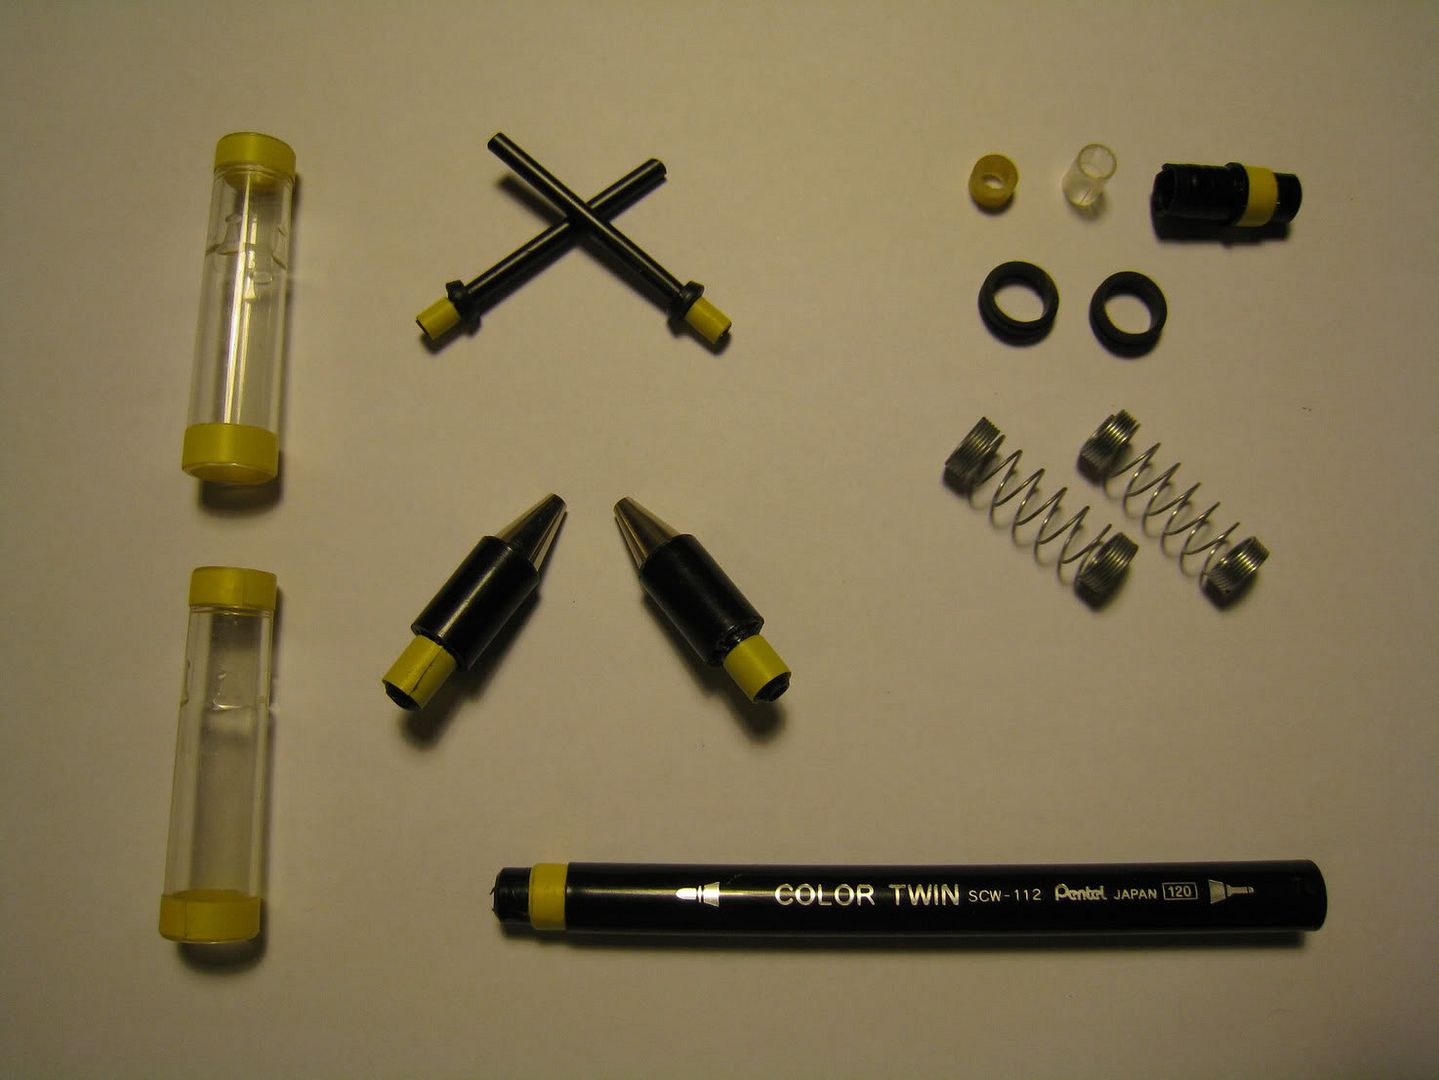
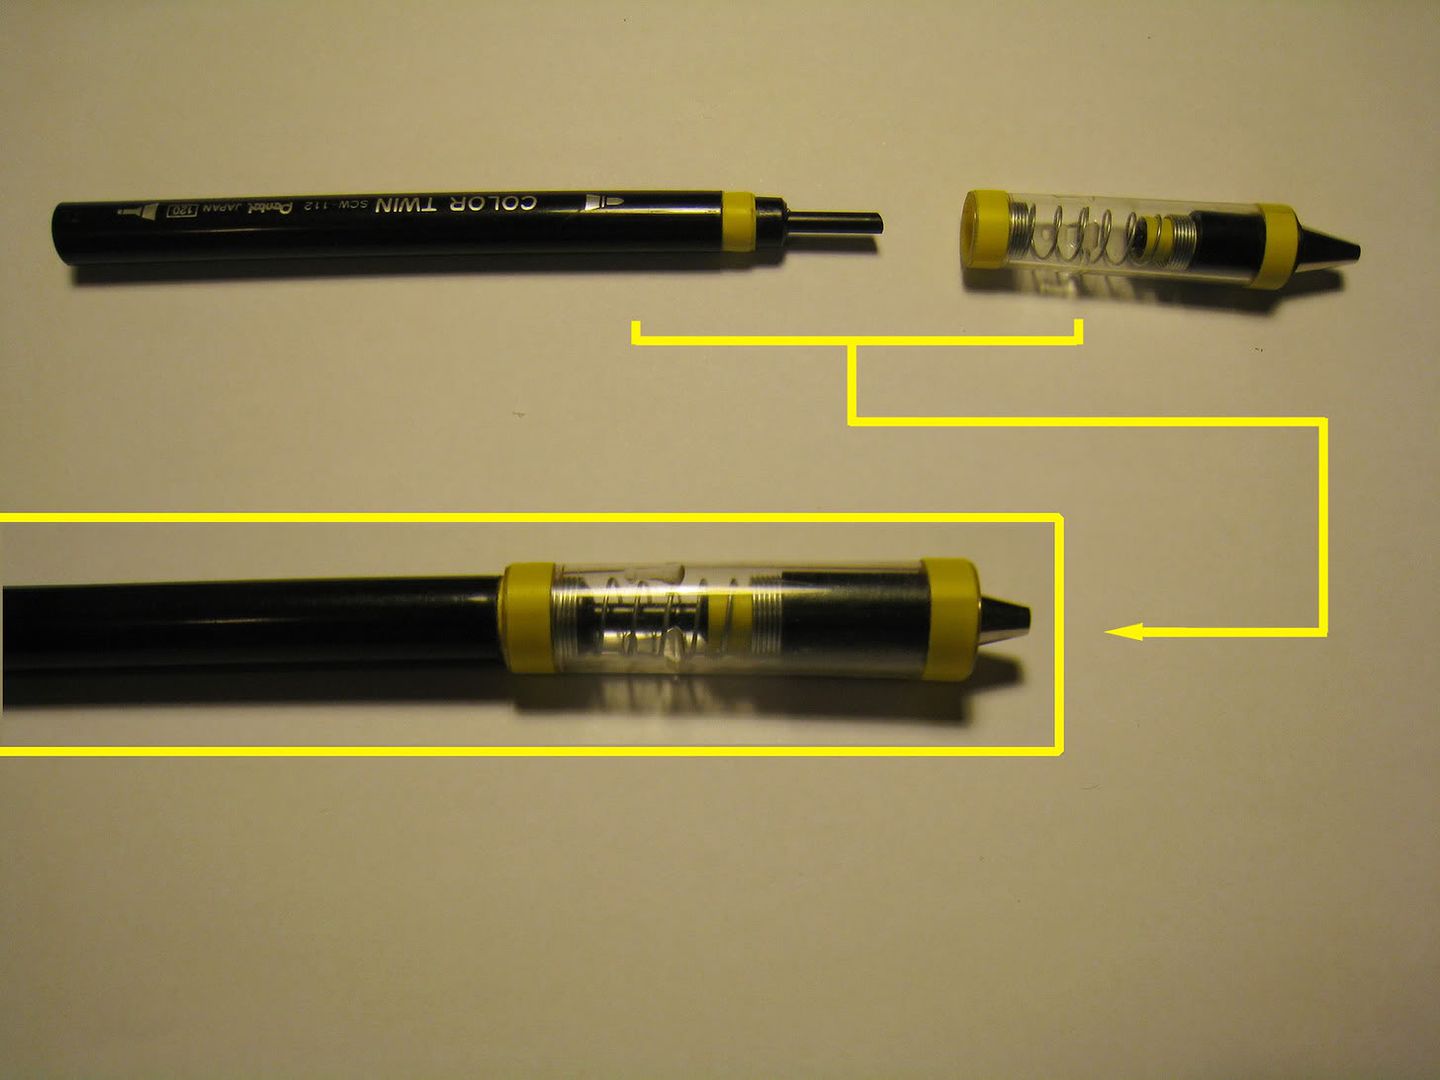
a. Disassemble CT and take note of the sections shown in picture that need to be cut, filed and wrapped with tapes (both ends of CT where wrapped with tapes are being filed before wrapping the tapes). Then use the forceps to slightly extend the hole of the CT plastic tips where mp tubes go through. (objective is to allow the mp tubes to retract freely)
b. Cut the 4 lines of Sailer Gel grip into 2 lines each.
9)
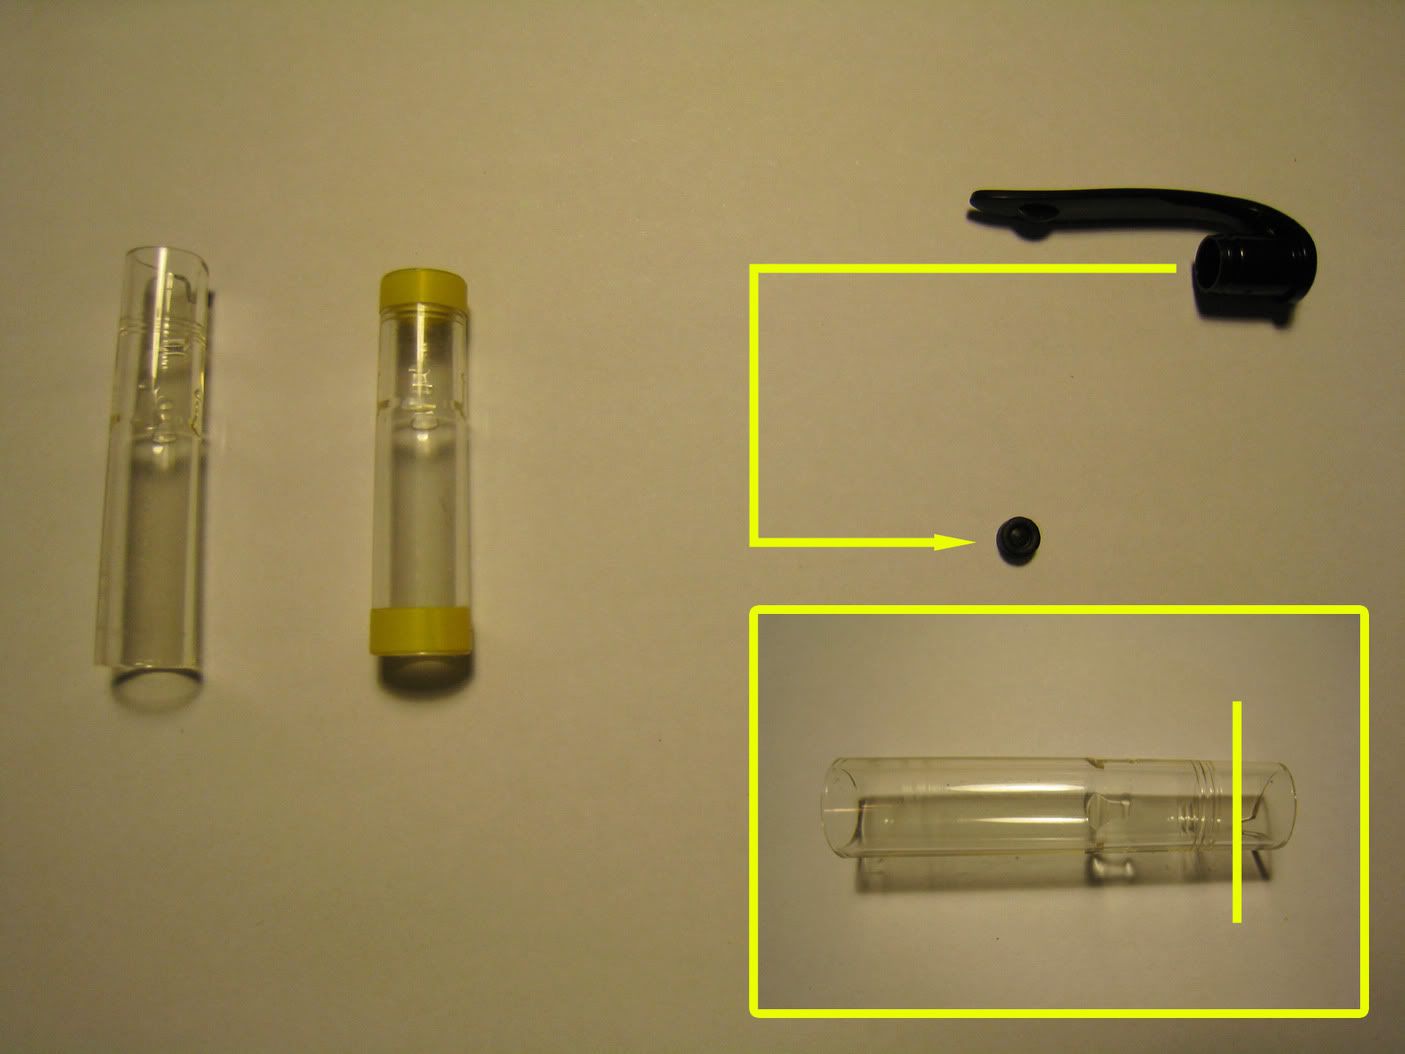
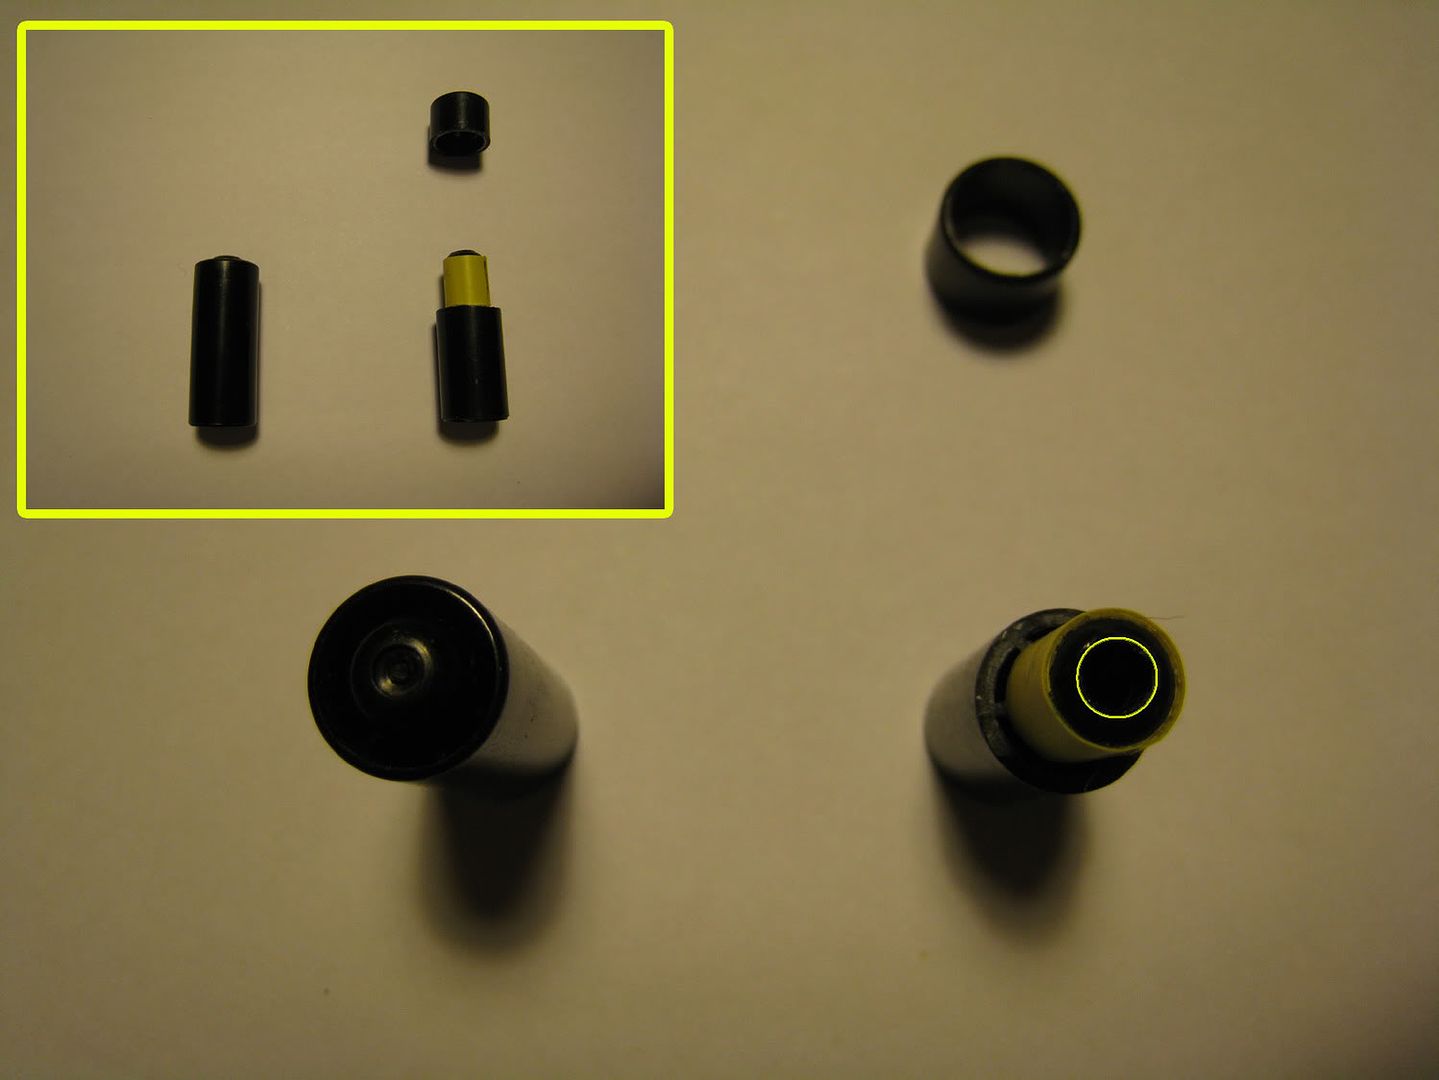
a. Measure 0.7cm from the end of the small CT caps and cut around as shown in picture (do not use hot knife method), then wrap with 0.6cm wide electrical tapes for 5-6 layers.
b. Make a small hole at the small CT caps (may do this with pin+forceps or scissors with sharp end), note that the hole should be slightly smaller than the outer diameter of mp tube. (to hold the mp tube firmly later)
10) File the 4 little bumps inside the small caps and tuck in the Signo tip.
11) Now you should have these, please check.
Part 2: Assembling Parts
12) Push the 3mm plastic piece which wrapped with electrical tape into CT barrel, make sure it is fixed.
13) Assemble the parts as shown in picture.
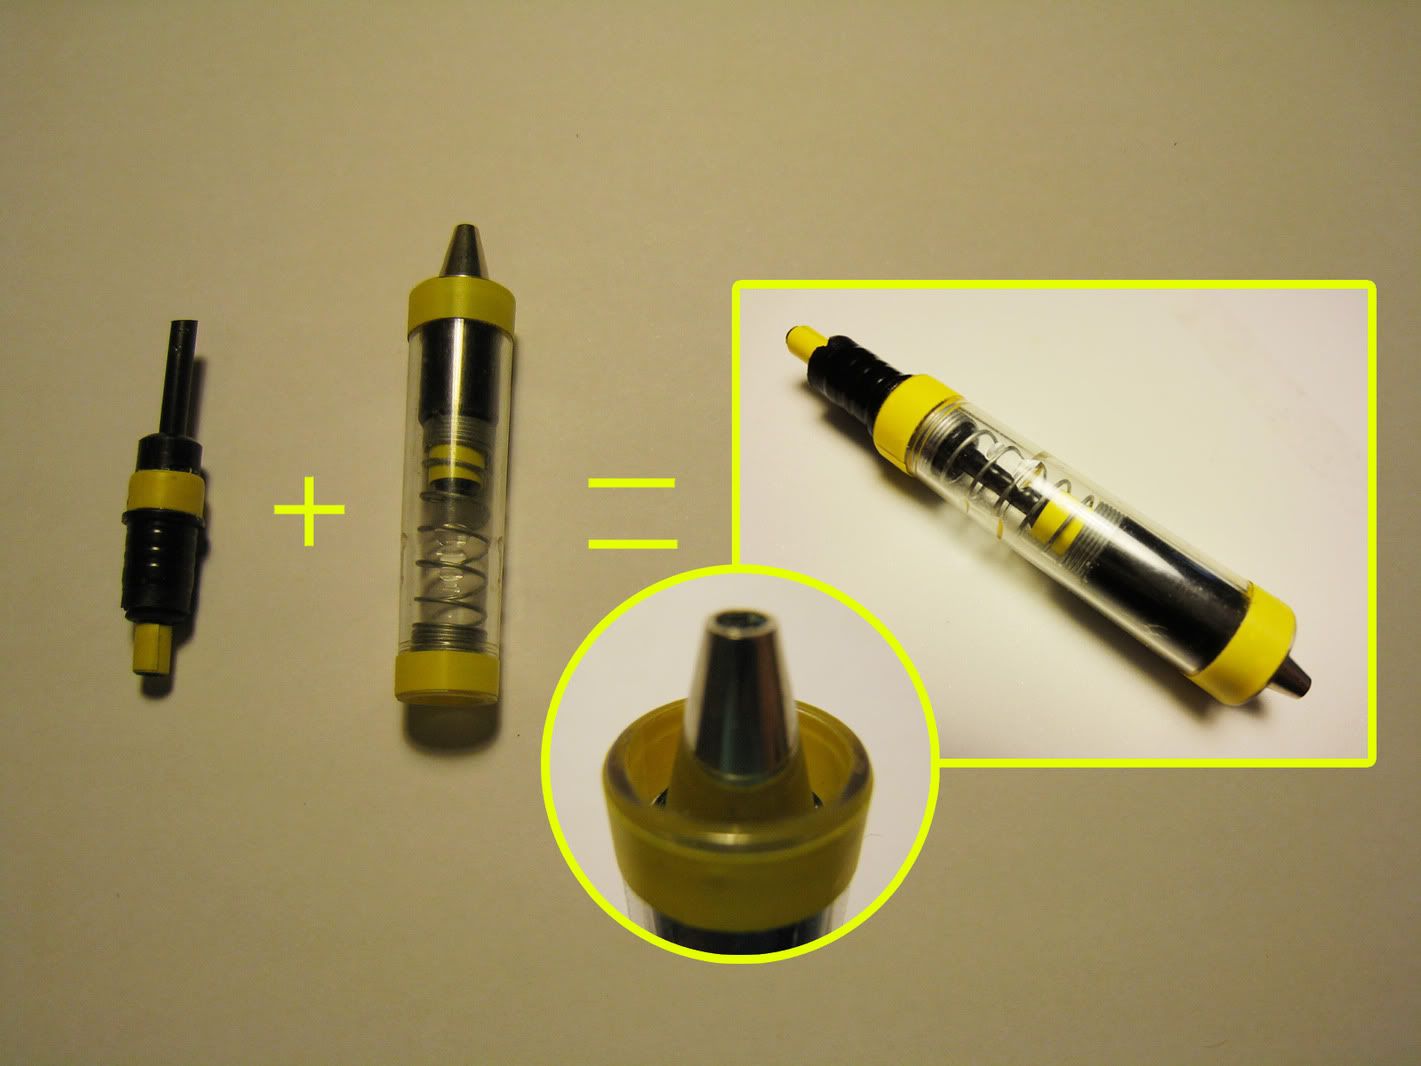
14) Assemble the parts as shown in picture, tuck the 8mm plastic piece into CT tip and insert the mp tube.
15) Put together the parts from step (13) and (14).
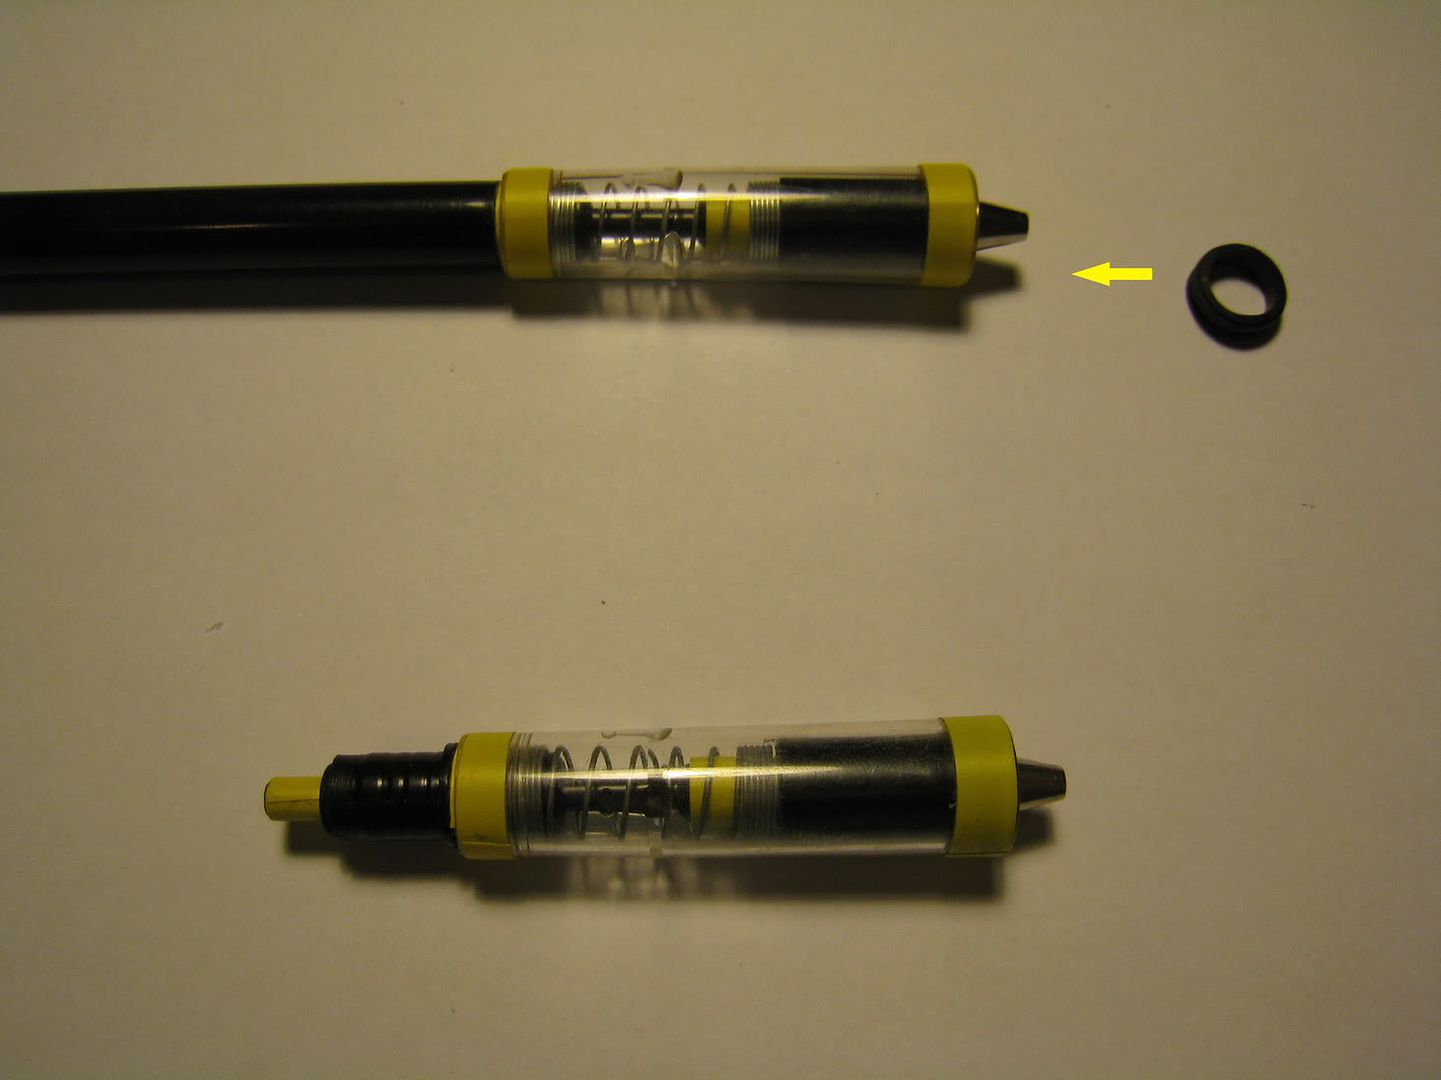
Note: This step is very, very difficult, certainly beyond imagination! The outcome of this step affects the solidness of the whole mod. It will be very tight, but better do it successfully at first try. In case failed, repeated insertions may expand the hole on the small cap causing the structure loosened and reduce the reverse bumper effect, and it will be very tight at first try (= =), very difficult to grasp the right force. When completed, the side view should show the tip being pushed in as seen in the picture, so it will achieve optimum reverse bumper effect. The depth is about 4-5mm.
16) The other side shall use the same approach as in step (15).
Note: This step may be even more difficult than last step because you need the ink tube(or stick) to push the axle, must be very careful. If unable to insert accurately, may use double plugs structure but will consume an extra CT tip. In this way, a little bit of superglue may be applied at where the extra plug will be inserted. However, if do exactly according to tutorial, please do not apply any superglue because it will be difficult to repair once broken!
Advice: Don't give up! If found the structure isn't solid and need to redo, 2-3 times will not affect the overall solidness much. As long as it isn't showing any obvious sign of the axle tube able to insert easily, it will be fine. If this step is done, the mod will soon done!
17) Stuff the SG grips at both ends. The SG grip must be stuffed neatly. May do it with forceps if needed.
18) Insert both ends and complete the mod.
(P.S.: If the CT tip isn't black so the joint doesn't look nice, adding a layer of 2mm wide electrical tape is a not bad idea.)
Congratulations, you've finally come this far. I believe it has been hard, but to ensure the mod's solidness, it is recommended that you do the following experiment: hold one end of the mod vertically, then let go the mod and allow it to fall on marble floor(concrete/stone floor is fine x]), for 3 times, for both ends will add up to 6 times, then check if the mod got any parts loosened. If yes, check back Part 2 for any problems and take corresponding measures. If no problem, then you can be proud that you have done a Nautilus mod!
----------------------------------
Q&A
1. This mod has a fine structure, will it able to withstand falling again and again?
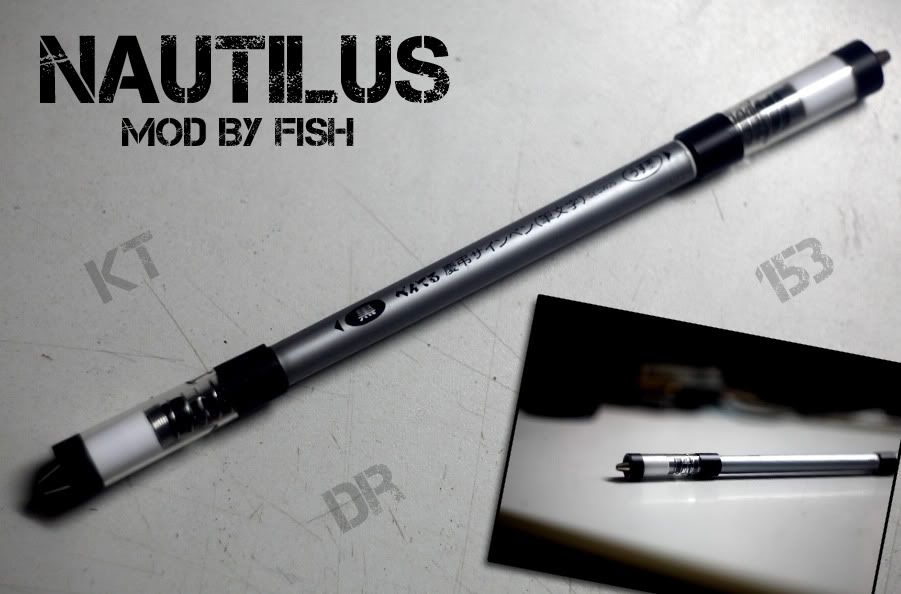
A: It was hard during the test, standing on chair to drop the mod to floor again and again... until the mod has become like - please see last picture in the tutorial. That was the result of being disassembled for more than 10 times and fell more than 20 times.
Although it has a fine structure, but due to the design, it will be able to withstand a lot of falling. No matter how i say, you will know when you actually have one.
2. The edge of Signo Broad cap looks like will break easily, is it?
A: Due to having the spring and axle, each time it falls and the cap was bended, it will automatically straighten the cap. This is why there is no particular requirement for the electrical tapes on both CT tips as long as it will hold the Signo Broad caps. However, there is solution to this, cyshing applied hot glue to the joint between CT tips and Signo Broad caps, which is better. (yeah, xD it doesn't affect disassembling/repairing, and to protect the edge of the signo broad caps, cover them with soft grips might be a good idea too.)
3. The shock absorption doesn't look so excellent because the bumper length(the space?) isn't long enough.
A: For this mod, bumper system is a function and tip protection is the objective. When a mod is spun for long, the tips are usually the first to be damaged, so a simple bumper system is indeed not good enough. Of course, if you want to make a powerful bumper system, you may use this for reference. Another solution would be not exposing the tips.
4. How to remove the clip of Signo Broad cap?
A: Place a metal ruler or forceps between the clip and cap, then press the metal ruler on the table with one hand and pull the cap with another hand. (I just poke it with chopstick after removing the little rubber piece)
5. What use for the axle? Can't just use SG grips to jam? Why need to use the little rubber piece in Signo Broad cap?
A: The first version of this mod has no axle. Both ends was jammed with grips that have larger friction. Later, a few changes made after the test which shown in the beginning of the tutorial and came out with this official version.
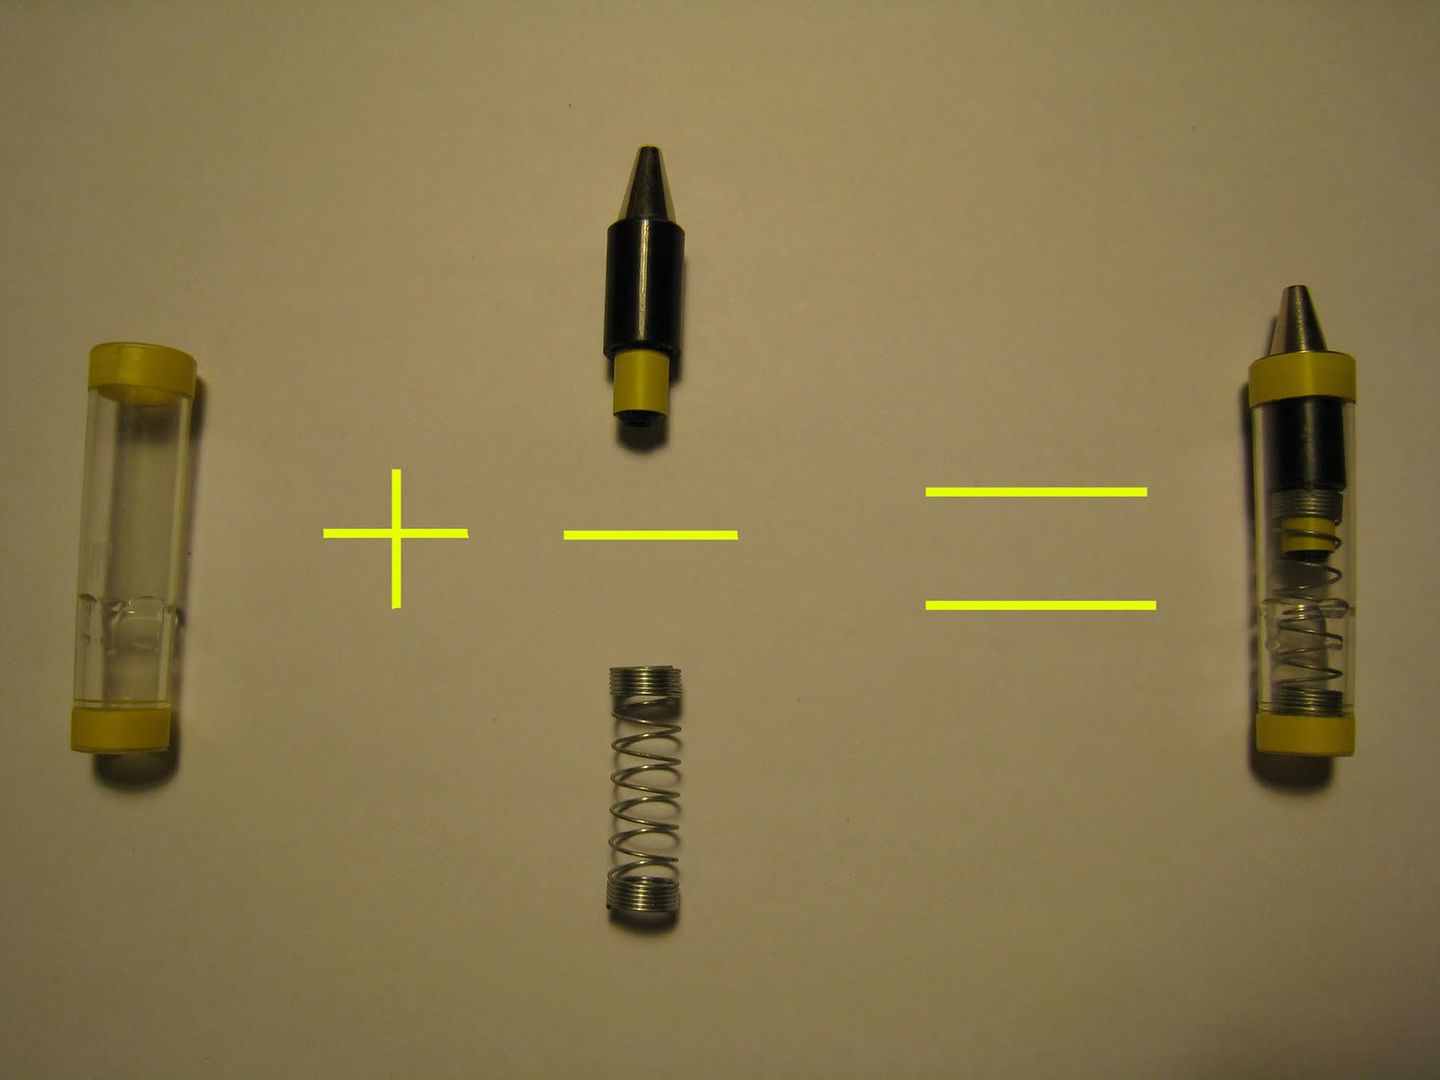
Now i call this double bumpers structure. The primary structure uses the mp tube axle as core, spring as front bumper the little rubber piece as reverse bumper (absorb the momentum from the other end when landing on the floor). The design takes the stress analysis when landing(not discussing this in depth, mainly it's about the whatever dynamics) into consideration and maximise the solidness and stability of the mod structure as much as possible by utilising limited materials. The real function of the SG grips are to prevent the bumper system to shake in non contact condition (if contacted, the effect of that little shake may be ignored compared to the effect of elastic force received). (i don't really get the last sentence but the SG grips do help to prevent the small CT caps rattling)
Finally, please ask if there is any problem. Thanks for reading and the support!
========== END ==========
Translator: cyshing
No comments:
Post a Comment
You are welcome to share your comments and suggestions as well as participate in the discussion.